Showing posts with label review. Show all posts
Friday, June 17, 2022
Lip Moisturizer Treatment Review
The best thing that I have found for keeping my lips moisturized, is the Original Vaseline Jelly. The label says that it is pure 100% petroleum jelly.
I have used a variety of other lip moisturizing treatments and balms, which were name brand, but I have had the best long term results with the original Vaseline.
I usually apply it after brushing my teeth. So for the most part, that is once in the morning, and again at night.
The nice thing about Vaseline, is that it's not just for lips. It can be applied to rough elbows, heels, etc., and also to squeaky door hinges!
As for applying the Vaseline to my lips or anything else, I use a clean Q-tip for each application. Just one dip per end of the cotton swab; that way the Vaseline stays clean for future applications.
Ready to order? This link will take you to the Amazon site: my lip moisturizer.
Need cotton swabs? These cotton swabs are organic, which is a plus in my book. Amazon didn't permit me to use a link for the Q-tips brand, but you are welcome to search for that brand, or whatever brand you might like, once on Amazon.
The above text links go to Amazon. As an Amazon associate, I earn income for qualifying purchases made from the above links.
Thank you.
Cheryl Paton
Wednesday, January 2, 2019
Rebounder Review
I have had a couple of mini trampolines, over the years. On the first one, the mesh wore out. When I replaced the first one, I was both surprised and impressed with my second one.
This newer model had more bounce to it. The stretchy fabric has more give to it than what my old mini trampoline had. It was a basic model for around $50.
And then, I got busy with doing other things, and it sat in the basement, awaiting for my return. Well you know what, after I switched to a plant based diet, I got more energy, and also had some extra time, so I got my trampoline out and bought it up to my living room to make it more convenient to use. It was a welcome and fun activity. So much so, that I decided to upgrade to one with more bounce and give to it. I was looking for one with bungee type cords over the metal springs. I liked that there wouldn't be squeaks to it.
I did some research and decided on the JumpSport 350 rebounder. It was within the weight limits for my husband and I, and had a great amount of repetitions that it could handle for its lifetime.
It had added bounce that I wanted, which feels like more fun to me. It is also quieter than the ones with the metal springs that I had before. The legs feel very solid and sturdy.
I had watched videos where people not only jumped on it, but kicked as well. So far my favorite exercises to do on it is to stand and bounce on it, and to just jog in place. Sometimes I also add arm exercises that coordinate with the jumps, and steps.
I like that this a fun way to get extra steps in and I don't have to drive somewhere. I also don't have to think about what the weather is doing.
This mini trampoline/rebounder has two thumbs up from me.
I found this one online on Amazon. (That is where the above link goes.) The rebounder was delivered rather quickly, and was so much easier to put together than the old models I had. I did not have to stretch metal coils to attach the fabric to the frame. All I needed to do was to attach the legs.
The other main difference is that this one sets a couple of inches higher, and also has a wider area to jump on. That also feels good.
Cheryl Paton
The above text links go to Amazon. As an Amazon associate, I earn income for qualifying purchases made from the above links.
Tuesday, November 10, 2015
No Attachments No Aversions Lesters Story
While on my spiritual path, I came across the book, No Attachments No Aversions, by Lester Levenson. Lester was a man who lived life, tried to get ahead, and ended up with all kinds of health problems, personal problems, and was given two weeks to live, three at most, by his doctors. He was sent home to die. He was told not to do the stairs.
He was frightened and scared, afraid to make a move. But gradually he thought, I'm still here. Then he decided to question himself. He went inside himself and began questioning how he got to where he was.
He also started asking himself when he was most happy. At first he thought of outside things that made him happy, but realized most of those were fleeting. He then realized that he was most happy when he was loving toward others.
Armed with his new knowledge, Lester started making changes to his feelings to feel more positive and loving toward others. This changed his life dramatically, for the better. Lester also decided to not eat animals anymore. Lester's health greatly improved after only about three months. He lived for another forty-two years, without seeing anymore doctors.
Levenson was truly an inspiration. You can read more about Lester Levenson, in his own words in his autobiography, in No Attachments, No Aversions.
Cheryl Paton
The above text link goes to Amazon, from which Cheryl Paton earns income from qualifying purchases.
Tuesday, August 26, 2014
Neskla Pedometer Review and Link to Purchase
I had purchased the Neskla Pedometer, and am impressed with what I have seen.
I used to have a non-battery powered pedometer, and it left quite a bit to be desired. The latest pedometers are battery powered and are more accurate, in my opinion.
Pros:
This Neskla Pedometer is on Amazon; it gives a cumulative reading for the steps taken, until you press and hold the reset button to zero it out. When it is reset, it will start again at zero and begin counting once it notices movement.
The unit remains on in sleep mode in between uses. It will start counting once it notices movement, and will display the steps taken once you have taken around 10-13 steps. The initial 10-13 steps are added in with the cumulative count. I reset my pedometer at the start of each new day, or when I take it off at the end of the day.
It comes with a removable clip, and also a lanyard if you want to wear it around your neck. It can also be carried in a purse, and still detect movement.
This unit comes with a long life battery that is good for up to a year.
Cons:
The one con about this unit, is it doesn't count swaying movements, i.e. side to side. So when I am dancing, it will count marching type steps, but not the hip sways that go from side to side. I would like it to count those movements too, as I am moving, so it should count. Anyway, other than that, I like it pretty well. Sometimes I just add some extra steps in for my daily count for the sways!
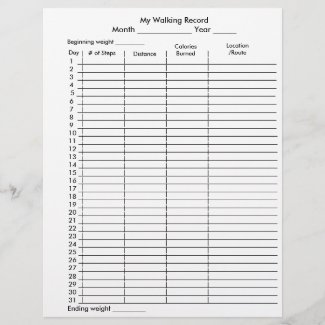
After I started walking on a more regular basis, I decided to keep a log. Here is a chart I came up with. This monthly walking chart is found in my CherylsArt store on Zazzle.
There are daily columns for number of steps taken, distance, calories burned, and also one for location. I thought it would also be nice to see if there was a difference in calories burned with a change of terrain, if you are keeping track of that. The column headings can also be customized; you can keep track number of water bottles drank in a day, protein intake for the day, etc.
I'd be interested to know your feedback on the chart design.
Thank you.
Cheryl Paton
I used to have a non-battery powered pedometer, and it left quite a bit to be desired. The latest pedometers are battery powered and are more accurate, in my opinion.
Pros:
This Neskla Pedometer is on Amazon; it gives a cumulative reading for the steps taken, until you press and hold the reset button to zero it out. When it is reset, it will start again at zero and begin counting once it notices movement.
The unit remains on in sleep mode in between uses. It will start counting once it notices movement, and will display the steps taken once you have taken around 10-13 steps. The initial 10-13 steps are added in with the cumulative count. I reset my pedometer at the start of each new day, or when I take it off at the end of the day.
It comes with a removable clip, and also a lanyard if you want to wear it around your neck. It can also be carried in a purse, and still detect movement.
This unit comes with a long life battery that is good for up to a year.
Cons:
The one con about this unit, is it doesn't count swaying movements, i.e. side to side. So when I am dancing, it will count marching type steps, but not the hip sways that go from side to side. I would like it to count those movements too, as I am moving, so it should count. Anyway, other than that, I like it pretty well. Sometimes I just add some extra steps in for my daily count for the sways!
After I started walking on a more regular basis, I decided to keep a log. Here is a chart I came up with. This monthly walking chart is found in my CherylsArt store on Zazzle.
There are daily columns for number of steps taken, distance, calories burned, and also one for location. I thought it would also be nice to see if there was a difference in calories burned with a change of terrain, if you are keeping track of that. The column headings can also be customized; you can keep track number of water bottles drank in a day, protein intake for the day, etc.
I'd be interested to know your feedback on the chart design.
Thank you.
Cheryl Paton
Monday, December 30, 2013
Hangman Dry Erase Board from Zazzle Review
My daughter and I like playing hangman, and started playing it on a small dry erase board. We liked the convenience and sturdiness of it, so I decided to make one on Zazzle.com.
I made a hangman design and added the alphabet, and repeated it to be able to play three games before having to erase.
The game is played a little different on the alphabet version, as each letter is crossed off from the alphabet, whether it is used or not, so the players can see the remaining letters left. That part may require a little getting used to, but overall works pretty well.
The hangman figure and the alphabet remain after erasing, which is pretty cool, for playing the game.
The dry erase board itself, from Zazzle, is made of an acrylic which has some thickness to it, and is see through. The print and the hangman design are printed on the card stock that it is attached to. This means, that if you're looking at the design straight on, everything looks good and lined up.
However, if you look at the board from an angle, the lines over the letters that have been crossed off, will appear a bit off set. So the board may need to be repositioned to see clearly which letters remain. Other than that, the game works well.
You can click on the link to see more details, and/or to order if you are interested.
It's also fun to play it on Post-It-Notes paper.
Cheryl Paton
CherylsArt on Zazzle.com.
I made a hangman design and added the alphabet, and repeated it to be able to play three games before having to erase.
The game is played a little different on the alphabet version, as each letter is crossed off from the alphabet, whether it is used or not, so the players can see the remaining letters left. That part may require a little getting used to, but overall works pretty well.
The hangman figure and the alphabet remain after erasing, which is pretty cool, for playing the game.
The dry erase board itself, from Zazzle, is made of an acrylic which has some thickness to it, and is see through. The print and the hangman design are printed on the card stock that it is attached to. This means, that if you're looking at the design straight on, everything looks good and lined up.
However, if you look at the board from an angle, the lines over the letters that have been crossed off, will appear a bit off set. So the board may need to be repositioned to see clearly which letters remain. Other than that, the game works well.
You can click on the link to see more details, and/or to order if you are interested.
It's also fun to play it on Post-It-Notes paper.
Cheryl Paton
CherylsArt on Zazzle.com.
Thursday, February 24, 2011
Use watercolor pencils for a color drawing, before painting with acrylic paint
Watercolor pencils work great for making a base drawing, for when you want to paint it in with acrylics and/or watercolors. A big plus is that you can now have your base drawing be in color, making the drawing so much easier to paint in. This comes in especially handy when making a rather large and/or intricate drawing.
The watercolor pencil markings will blend right in with the acrylic and watercolor paint. Any exposed watercolor pencils markings, can be wiped off with a damp paper towel after the paint has dried (when painting on a canvas or such surface with acrylic paint,) giving your painting a nice clean and blended look when finished. No more dark pencil marks showing through or smearing in with the paint!
I've used black drawing pencils before, and it had blended in the dark of the pencil with the acrylic paint, which I then had to go back over again and touch up. Using the watercolor pencils alleviated that extra step.
If you're looking for a watercolor pencil with a good grip, I recommend The Ergosoft watercolor pencils, by Staedtler; this link goes to Amazon. These watercolor pencils have a thin rubber type coating on the outer layer of the pencil. The body of these pencils have a rounded triangular shape, which I also find pretty comfortable to hold.
I just use a regular sized pencil sharpener to sharpen them.
Cheryl Paton
The watercolor pencil markings will blend right in with the acrylic and watercolor paint. Any exposed watercolor pencils markings, can be wiped off with a damp paper towel after the paint has dried (when painting on a canvas or such surface with acrylic paint,) giving your painting a nice clean and blended look when finished. No more dark pencil marks showing through or smearing in with the paint!
I've used black drawing pencils before, and it had blended in the dark of the pencil with the acrylic paint, which I then had to go back over again and touch up. Using the watercolor pencils alleviated that extra step.
If you're looking for a watercolor pencil with a good grip, I recommend The Ergosoft watercolor pencils, by Staedtler; this link goes to Amazon. These watercolor pencils have a thin rubber type coating on the outer layer of the pencil. The body of these pencils have a rounded triangular shape, which I also find pretty comfortable to hold.
I just use a regular sized pencil sharpener to sharpen them.
Cheryl Paton
Friday, August 27, 2010
Painting People in Acrylic with Lee Hammond
When I first started painting people in acrylic, I looked at the photo and made my best guess with the skin paint colors that I had on hand. Once I got the book, Painting People in Acrylic with Lee Hammond, I opened up to more color possibilities. I added orange, blue and red; not the normal colors I had normally added when painting skin tones.
With the practice exercises of painting spheres, my blending techniques also improved.
This is the first face painting I did after practicing some skills that I learned in Hammond's book.
There are some things I would do differently now, were I to paint this boy again; however I am pleased with my first attempt with the skills I learned then.
If you're looking to take your skin painting skills in acrylic to the next level, I recommend this informative book by Lee Hammond, Paint People in Acrylic. It covers tips for painting skin as well as fur, brush maintenance, blending techniques, and more.
Paint People in Acrylic on Amazon
Cheryl Paton
With the practice exercises of painting spheres, my blending techniques also improved.
This is the first face painting I did after practicing some skills that I learned in Hammond's book.
There are some things I would do differently now, were I to paint this boy again; however I am pleased with my first attempt with the skills I learned then.
If you're looking to take your skin painting skills in acrylic to the next level, I recommend this informative book by Lee Hammond, Paint People in Acrylic. It covers tips for painting skin as well as fur, brush maintenance, blending techniques, and more.
Cheryl Paton
Subscribe to:
Posts (Atom)